
In this guide, we'll provide an overview of the settings within WolfPack CRM. This will help you navigate and manage your account settings effectively.
Watch the video below to learn more about Settings in WolfPack.
The settings tab can manage the following:
-
Users & Groups
-
Account Settings
-
Advanced Settings for email authentication
-
Business addresses assigned to email lists
-
Integration management
-
Developer Information
-
Manage custom field values for contacts, deals, and accounts
-
Notifications
-
Saved Responses
-
Account Security
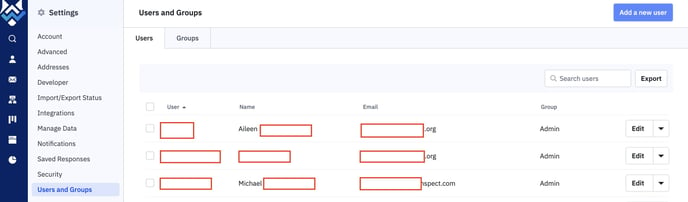
Users and Groups
Managing Users and Groups
-
The Users and Groups section lets you see all users and their associated groups.
-
A group functions like a user role.
-
You can create different user roles by adding a new group in the top right corner and managing users within those groups from the users' tab.
Accessing Settings

-
To access the settings, go to the bottom left-hand corner of the screen and click on the tab labeled Settings.
-
This will open a submenu with various setting options.
Managing Account Settings
-
The Account tab allows you to manage your user account settings. Here are the options available:
-
Account Name: Your unique account identifier.
-
Username: The name you use to log in.
-
Profile Photo: Managed via Gravatar, this is the photo associated with your account.
-
First Name and Last Name: Your personal information.
-
Login Email: The email address you use to log in.
-
Phone Number: Your contact number.
-
Signature: This signature will appear on any emails sent from the system.
-
Time Zone and Language: Set your preferred time zone and language.
-
Reset Password: Change your password if needed.
-
Advanced Settings
Email Deliverability
-
Under Advanced, you can manage more complex settings, such as email deliverability.
-
There is a separate article on email authentication if you wish to update or manage your email authentication with DNS records.
Date and Time Format
-
You can also change the date format, time format, and how date and time are displayed together.
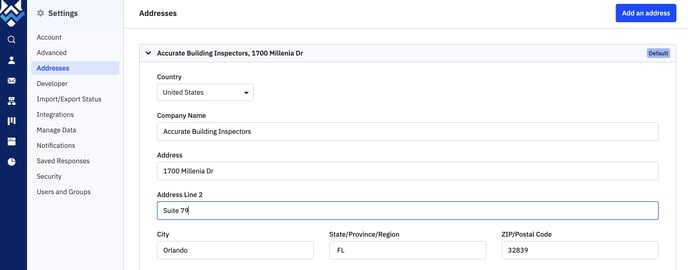
Business Address
-
The Addresses section is where your business address information is stored. This is important for any mass email lists you have, as they must be tied to a business address.
-
If you have multiple business addresses, you can select which email lists are assigned to specific addresses.
-
By default, most companies will have all their email lists tied to one particular business address. Remember to save any changes once you’re done.
Integrations
Managing Integrations
-
Under Integrations, you can manage and connect any integrations you have. This can be done through the app section found in the bottom left-hand corner.
Developer Tab
API Access Information
-
In the Developer tab, you can find information regarding API access.
Managed Data
Custom Fields
-
The Managed Data section allows you to manage custom fields under different objects, such as contacts, accounts, and deals.
Notifications

Changing Notification Settings
-
In the Notifications section, you can change the type of notifications you receive and when you receive them.
Saved Responses

Managing Saved Responses
-
You can manage categories and add or edit saved responses here. Saved responses are automatic or templated emails that can be sent out through the contacts tab.
Security

Multifactor Authentication and Session Timeout
-
The Security section allows you to enable multifactor authentication and set a session timeout.
-
If you have a single sign-on for the enterprise level, this can also be enabled here.
This overview provides a comprehensive look at the settings available in WolfPack CRM. If you have any further questions, feel free to comment on this article or contact site support. We are always here to assist you!